Tuesday, September 6, 2016

Today I Am Enough


 I am enough

You are enough

We are enough

Do you ever struggle to feel good about yourself? Is your life stressful and crazy and non stop chaos all the time? During the mundane hum drums of life, its so easy to get caught up in feeling 'less than.' I will admit that I get caught up during the stress of my day and feel frustrated with myself, or others, to be better. 

Last February, I was able to connect with an online friend, who I had met through a Facebook group. Her name is Kara, and she was a busy mom just like me. We had both set goals for ourselves, physically and mentally and were supporting each other through the process. Not every day was easy, and sometimes I really felt discouraged. Changing the outside of yourself most likely always changes the inside as well. At the end of our program, we both came out better people.  I knew that I needed to share my love of vegetables and nutrition with others. And Kara knew that she wanted to share the self love she found through her journey.

Kara has started a blog called Today I am Enough. On her blog she says:

Today I am Enough is here to uplift, inspire, and ultimately become a safe place where you can be reminded of your potential and your worth and of God’s love for you.  I want you to be pleased with what you’ve accomplished no matter what it was – mothering, cleaning, career, education, etc. Seeing your worth for who you are and not basing your worth on your tasks or how you look. 

The fitness industry is brutal. Social media can be tough. Weight loss groups can be all about the scale. But sometimes we need to take a stand and say no. No to images, no to unrealistic goals and yes to being happy with where we are now in our journey. If you are unhappy 40 pounds overweight, chances are losing those 40 pounds won't change that. 

Today I want to challenge you to start believing that you are enough. Right now. Wherever you are in your journey. 

Because you are amazing, strong and beautiful. 


Sunday, August 28, 2016

My Favorite Makeup......Ever!

First of all I would like to preface this with the declaration that I am not a beauty blogger. 

Do I love beauty? Yes! 

Am I super picky about the products I chose to put on my face? Absolutely. 

Have I had any training at all when it comes to professionally doing my makeup? Nope!

The most important part of a good makeup system, starts with a good foundation. I have spent oodles of money on mineral foundations that make my skin look dry, and what I have found as I have gotten older (ahem) is the liquid foundation pools in my wrinkles. After a few years bouncing between products, I finally just gave up on foundation all together. I have been fascinated with the idea of 'contouring' but every You Tube video I watched just confused me. Between not knowing which products to buy and ending up with dark streaks randomly on my face, I gave up on my "Kim Kardashian contouring cheekbones of a greek goddess" dream. 

And then I get a gig on TV. 

Ironic, right? Once I month I have to make myself look as good as humanly possible. I have to be there bright and early, so knew hiring a professional to come over every month wouldn't be an option. So now I knew, it was up to me....gulp!

About a year ago, I had heard about a new foundation and countering system developed by a beauty blogger Cara, who runs one of the most popular beauty blogs Maskcara . I had been at a local Pinners conference and attended one of her classes. I couldn't help but notice how flawless her makeup looked. It looked almost if she had no makeup on, but every feature of her face was highlighted so well. All day long she had a line of women at her booth. One by one they walked away looking fantastic, no matter their age. I thought, this is on my list to try!

When I received the products in the mail, I was so excited to open it. The makeup is so perfectly packaged, and I love the fact that I could build my own pallet according to my needs. And you guys...best part? Each case is magnetic, so the makeup actually stays together. You can turn the entire pallet upside down and it totally stays in. 

No more crying over spilled makeup...like....ever. Take that toddlers!


As soon as I did, I saw a card explaining exactly how to contour and I went on her website and watched a short video on how to apply the IIID system. I even took my iPad into my bathroom and watched the video about 10 times before I got up the courage to try it. 


I had originally planned for it take about 30 minutes from start to bottom. To my complete shock and surprise, I was done in 10. That concerned me, because I had thought I had done it wrong since it was so easy. Surely you can't get a fresh face of makeup on in 10 minutes. But then I looked in the mirror at the finished product and I was blown away. It was clean, simple and I looked like myself, just a better version. Now that I have had a couple of week of practice I have it down to 7 minutes, which is  crucial to this 'mom of 4 kids'. The only other thing I put on is liner and mascara and I'm out the door.                                                                               

Before


After

And then the true test came....TV day. 

I was curious to see the changes on camera. I was worried that since it was such a natural look, it wouldn't come through right on film. But guess what, my makeup looked better than ever. 

Natural, simple, and like myself. Isn't that what all women want from their makeup?


I cannot express enough how SIMPLE this system is. With the IIID system, you get a contour shade, foundation, blush and highlight cream. I have never used cream blush before but I will never use the powder stuff again. It goes on so smooth and natural. And the setting powder is the perfect finishing touch! After I am all done, I can literally feel my skin glowing. 

You can find more information on Mascara's makeup line and pricing here. Use code "veggielisa" for 10% off

Thursday, August 25, 2016

All About Zucchini

Here in Utah, few things grow as prolific as zucchini. Just about every garden in the neighborhood is full of it. And the best part? People are always willing to share. Here is not only one, but two recipes that will help you use up all of that beautiful zucchini. 

And when January comes, we will all cringe at the thought of paying $2 per zucchini! Until then, eat up.


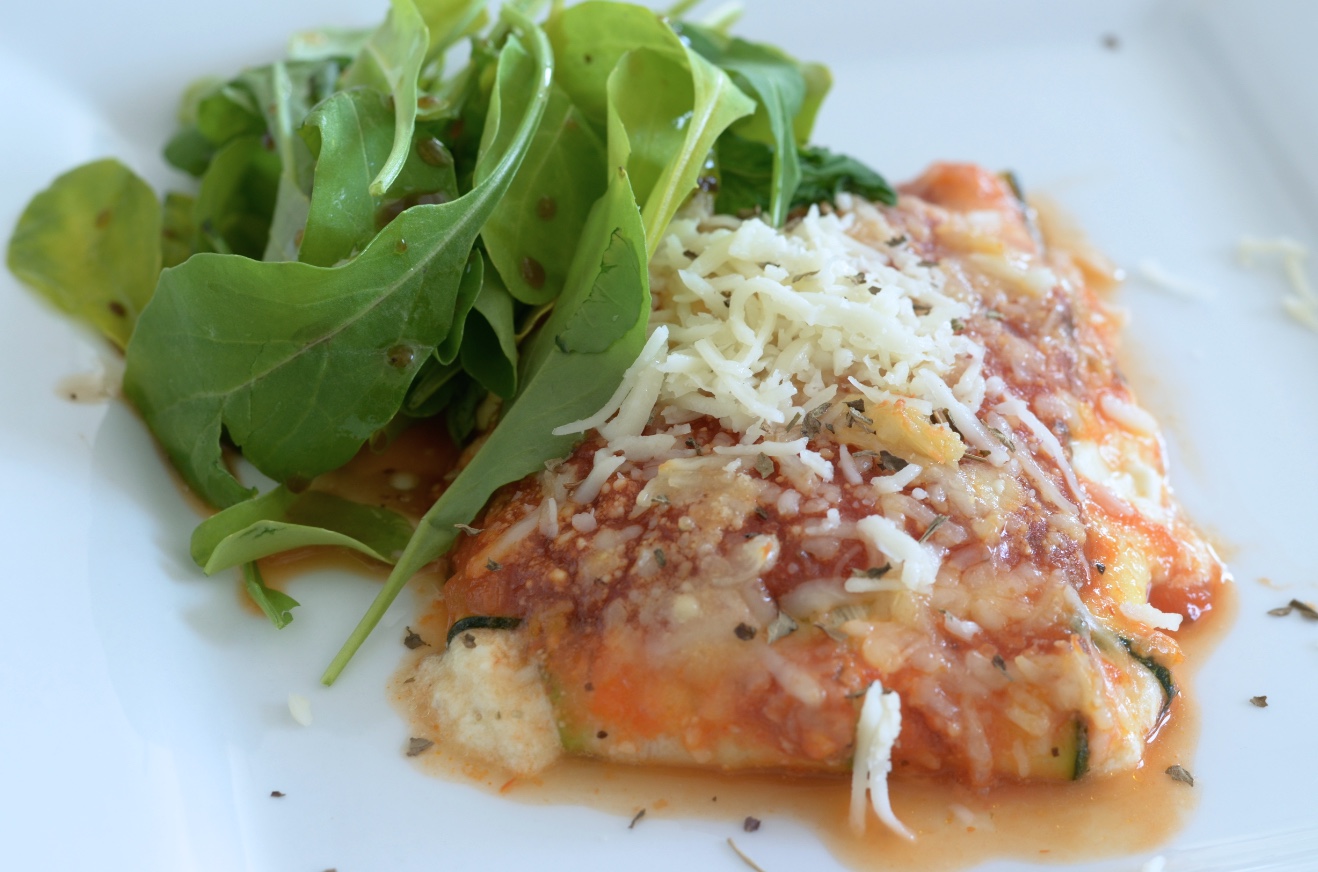
Zucchini Lasagna Baskets

2 medium size zucchini, stems cut off
1 jar high quality spaghetti sauce
¾ cup part skim ricotta cheese
¾ cup lowfat cottage cheese
¼ cup shredded parmesan cheese
1 egg, beaten
1 tsp minced garlic
salt and pepper to taste
½ cup part skim mozzarella cheese

·      Spread a thin layer of sauce on bottom of 13 x 9 casserole dish
·      Preheat oven to 350

·      Using a vegetable peeler, scrape thin slices of zucchini one at a time, until it is no longer scraping in whole pieces. You will get about 15-20 out of each zucchini. Set aside


·      Mix the cottage, ricotta, and parmesan cheese. Add egg, garlic and salt and pepper

·      Make a T with two slices of zucchini. Then make another T just opposite so a basket pattern is formed. Place about 2 TBSP of filling in each zucchini “basket”. Then fold up the zucchini and place seam side down on casserole dish. Repeat until filling and zucchini is gone


·      Pour sauce on the top of each basket and in the dish. Depending on how saucy you want it, use a little more or less. Top with 1/2 cup mozzarella cheese

·      Cover with foil. Cook for 30  mins
·      Take off foil, turn broiler to low. Cook for an additional 5 minutes or until cheese is bubbly


 Chocolate Chip Zucchini Cookies

1 ½ cups white whole wheat flour
1 tsp cinnamon
½ tsp baking soda
¼ tsp salt
½ cup melted coconut oil
½ c maple syrup
1 large egg
1 ½ tsp vanilla extract
1 ½ cups shredded zucchini
1 cup quick oats
½ cup chopped walnuts (optional)
1 ½ cup dark chocolate chips

·      Preheat oven to 350. Stir together flour, cinnamon, baking soda and salt. Set aside

·      In a separate bowl, or in a mixer stand, add coconut oil and maple syrup until well mixed. Add in the egg and vanilla. Stir in zucchini


·      Stir flour mixture slowly into wet mixture. Add in oats, walnuts, and chocolate chips

·      Scoop batter into balls and shape if needed on cookie sheet. Bake for 11-12 minutes. Allow to cool slightly (about 1-2 mins) and transfer to wire rack to cool completely


·      Store in airtight container


Sunday, August 21, 2016

Use up those garden veggies....

Is your garden bursting at the seams with fresh veggies? This time of year is always my favorite. Nothing like a good garden harvest. Here is in the west, we can grow corn and cucumbers like nobody's business! Here is a hearty and flavorful said to put those veggies to good use.


Roasted Corn Garden Salad

4 cups arugula, washed and dried
1 cup cherry tomatoes, quartered (tri colored work well)
1 ½ cups roasted corn (place on cookie sheet, toss with olive oil and roast on low broil for 10-13 mintues, cool)
1 cup cucumbers, sliced thin
2 red bell pepper, diced
½ cup sliced red onion
1 cup tri colored quinoa, cooked according to package directions. Cool completely
2 large avocadoes, diced (optional)

Dressing:
4 ounces feta cheese, crumbled
1/3 cup unsweetened almond milk
¾ cup plain nonfat Greek Yogurt
2 tsp minced garlic
salt and pepper to taste

(mix together. Allow to chill for 1 hour before serving)

·      Place arugula in large serving bowl. 
·      Top with vegetables and quinoa
·      Add avocadoes (optional)

·      Pour dressing on right before serving. Toss well


Sunday, August 14, 2016

Summer Quinoa Fruit Salad


Summer Quinoa Fruit Salad

2 cups cooked red quinoa
1 cup diced strawberries
1 can mandarin oranges, drained
1 cup blueberries
¼ cup raw honey
2 TBSP lime juice
dash of cinnamon
½ tsp salt
1 cup pecans
2 TBSP maple syrup

·      Add in large serving bowl quinoa and fruit
·      In separate bowl mix together honey, lime juice, cinnamon and salt
·      Place peans on small cookie sheet with silicone mat
·      Toss lightly with maple syrup and broil on low for 7-9 minutes, flipping the nuts half way through
·      Remove from oven and allow to cool (as they cool they will harden)
·      Toss salad with honey mixture
·      Top with glazed pecans
·      Serve immediately


Tuesday, August 2, 2016

Uplift Families

One of the things I love most about living in Utah is how family oreinted the community is. From suckers at the bank, the playroom at the health food store to discount activities for the whole family, Utah is a great place to raise kids. Each family is unique, with their own triumphs and trials. I remember when my kids were small, getting to nap time in one piece was my only goal for the day. Now that they are growing up I worry about who they are sitting by at lunch, if they are polite to their teachers and pressures of social media.

Utah's First Lady, Jeanette Herbert has started an initiaive Uplift Families, where all of Utah's families are provided with information, resources and support. Spending 20 plus years in Education, Mrs. Herbert feels strongly about encouraging good parenting skills and in turn strengthening families. The vision of Uplift Families is to promote happiness, prosperity and societal stability through strong families and meaningful parent-child relationships. The mission of this initiative is to connect parents with the state's resources to help them acquire the skills necessary to raise loving, responsible children.


A few weeks ago I was lucky enough to attend a blogger's luncheon at the Governors Mansion in Downtown Salt Lake. There, Mrs. Herbert shared her vision with and passion for this program. If you would like more information, HERE is the link to the Uplift Families website.

An exciting part of this program is  Uplift Families will be holding a conference On Saturday August 27, 2016 at Thanksgiving Point Show Barn in Lehi. To purchase tickets go HERE and if you enter in code 2016$5offVL you will receive $5 off. I went last year and it was a great date night!


Thursday, July 21, 2016

Gourmet Toast 4 Ways

If you've been to any health food restaurants lately you've probably seen some gourmet toasts on their menu. Not only are these SUPER easy to make (I mean, it's just toast after all) but they are a perfect snack or quick dinner when you are in a hurry. I hate heating up the kitchen in the summer time, so I will make a batch of these and some smoothies and voila! You have dinner.


Italian Summer Toast

1 slice Dave’s Killer Bread (thin slice)
½ avocado, smashed
1 slice of fresh mozzarella, segmented
3 leaves basil, chopped finely
balsamic vinegar
Cracked black pepper and salt to taste

1.     Toast bread (I have found the crunchier, the better!)
2.     Layer avocado on first, then mozzarella and basil
3.     Drizzle with vinegar and top with salt and pepper


Sweet Berry Toast

1 slice Dave’s Killer Bread (thin slice)
¼ cup lowfat cottage cheese
2 fresh strawberries, sliced
1 TBSP sliced almonds
2 tsp raw honey

1.     Toast bread (I have found the crunchier, the better!)
2.     Mix cottage cheese with 1 tsp of the honey
3.     Layer cottage cheese on first, then strawberries and then almonds
4.     Top with a drizzle of raw honey


Almond Butter and Banana Toast

1 slice Dave’s Killer Bread (thin slice)
2 TBSP natural almond butter
½ banana, sliced
1 TBSP chopped peanuts
1 tsp raw honey
dash of cinnamon


1.     Toast bread (I have found the crunchier, the better!)
2.     Layer almond butter (best to do this when bread is hot), then the banana
3.     Top with chopped peanuts and drizzle with raw honey
4.     Sprinkle cinnamon to finish off


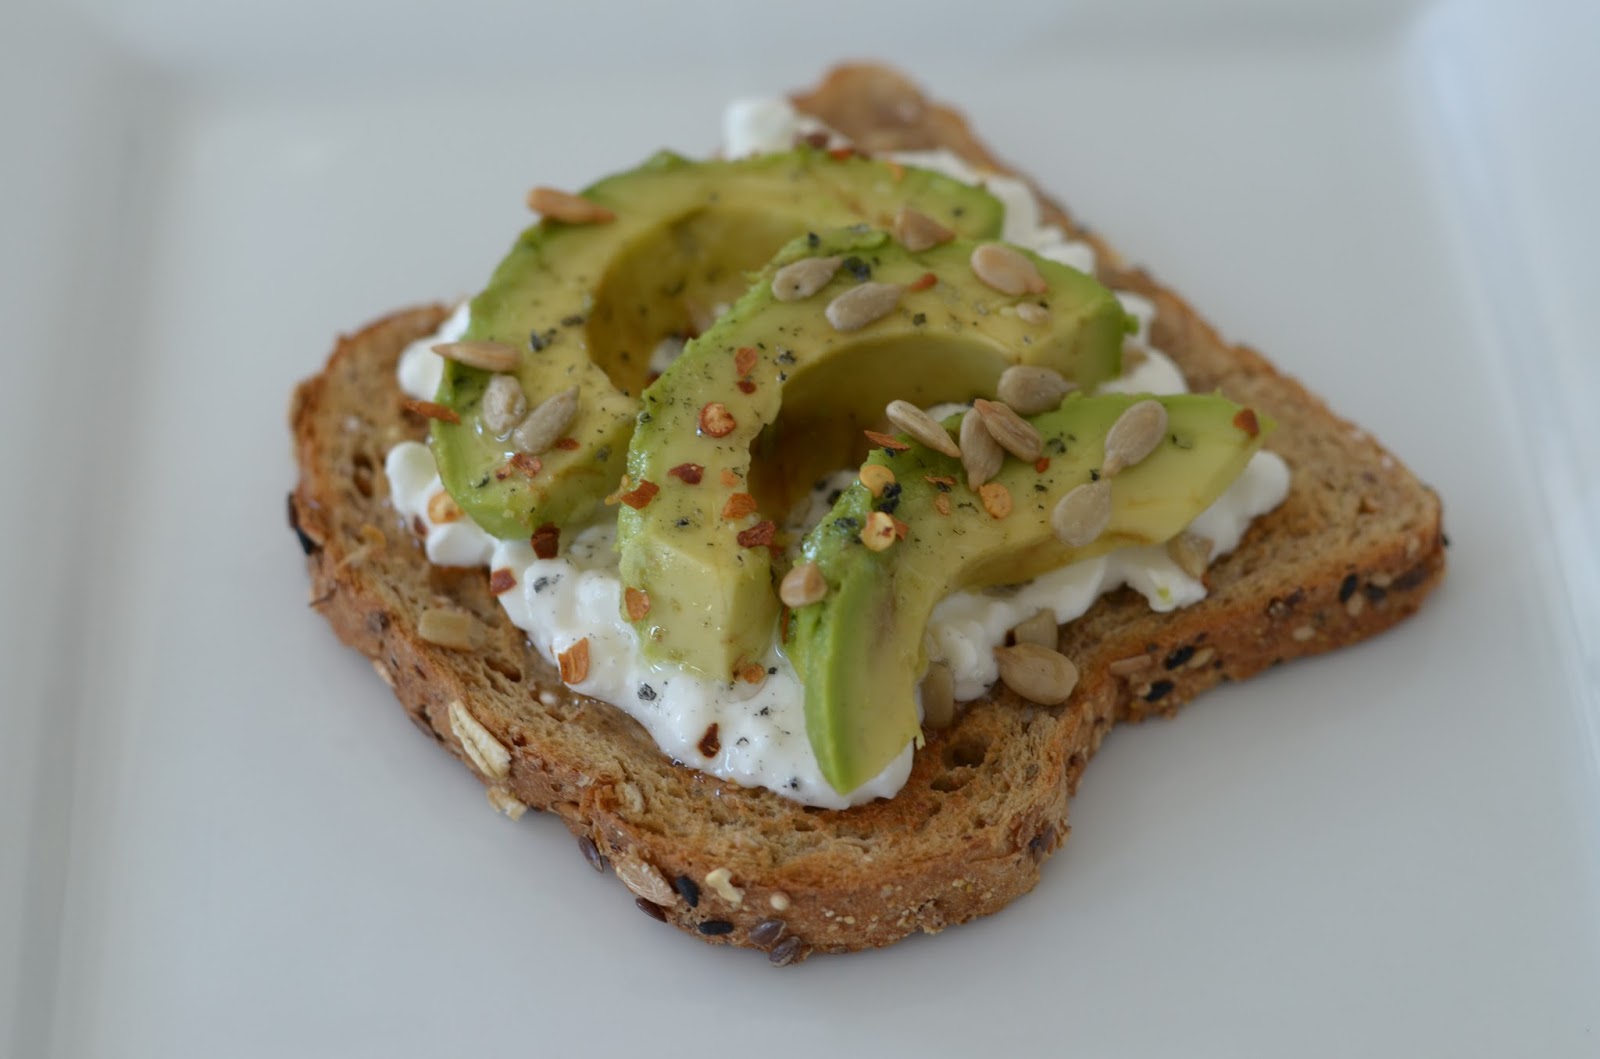
Sunflower and Avocado Toast

1 slice Dave’s Killer Bread (thin slice)
¼ cup lowfat cottage cheese
½ avocado sliced
1 tsp olive oil
sprinkle of red chili flakes
2 tsp sunflower seeds
salt and pepper to taste

1.     Toast bread (I have found the crunchier, the better!)
2.     Layer cottage cheese and then the avocado
3.     Drizzle olive oil over top
4.     Sprinkle sunflower seeds and red chili flakes
5.     Finish toast off with salt and pepper


Blog Design By: Sherbet Blossom Designs